
Excel for Mac: How to Use Flash Fill
3 May 2024
This week in our series about Microsoft Excel for Mac, we show you an important tip about ‘Flash Fill’. On Mac, it’s one of those things that you need to know. If you know, you know. If you don’t know, then ‘Flash Fill’ won’t help you.
If you’ve ever experienced an automatic ‘Flash Fill’ in Excel for Windows, you know it feels magical when it happens. You might be typing some values in a new column next to your data, and Excel automatically fills in the rest of the values based on the first few examples that you’ve typed.
Flash Fill Works on Mac, But it’s Not Automatic
Many features in Excel are powerful, but you can’t take advantage of them unless you know about them. What makes ‘Flash Fill’ a bit different, at least on Windows, is that you don’t need to know about it. You can just enter some data, and it shows itself when it can help. It does come at a slight cost, though. ‘Flash Fill’ is always watching what you’re typing, and trying to detect if there’s a pattern that it can follow. In most cases, there’s no noticeable impact on performance, so you won’t notice any slowdown in Excel. However, concern about performance is probably the reason why it’s not automatic on Mac.
Even so, it is very simple to use:
- Type a value in a cell next to existing data in your sheet. In the example shown below, we typed “blue” in cell B2
- Then press the ‘Flash Fill’ button on the Data tab of the Ribbon or press CTRL + E on your keyboard

- ‘Flash Fill’ will then fill in all the other rows to follow along with the example you typed. You can then proceed with making corrections or accepting the suggestions
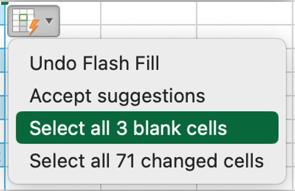
- You’ll see a pop-up button near the top of the list of cells where ‘Flash Fill’ did its work.You can press the button or you may select all the cells that were changed by ‘Flash Fill’:

If some cells were left blank, you can select those from the menu, making it easy to find them. Then you can type a value that you want for those cells that Flash Fill wasn’t able to fill for you.
You should note that another difference between Windows and Mac is that on Mac there is no keyboard shortcut to open the ‘Flash Fill’ options menu that appears. You can only open it on Mac by clicking it with your mouse. On Windows, you can simply press the CTRL key on your keyboard.
The End Result is the Same
Despite the differences mentioned above, the values that result should be the same as you would get in Excel for Windows. The differences are just that it’s not automatic, and it doesn’t show a preview of the data (as shown below), which is where the suggested values appear in a light gray. It just fills in the values.

We hope you find this topic helpful. Check back for more details about Excel for Mac and how it’s different to Excel for Windows.